


Getting Started
If you are going to draw with Illustrator, download our template here. In it, the maximum dimensions and colors are already set so you can get started right away. As always, you can draw up to the maximum plate size (1200x600mm for most materials).
Using blue lines, draw the shapes that should form cuts to make your stencil, and also draw a frame around the shapes to indicate the outer edge of the stencil. If you want to make more than one stencil you can merge the drawings for that until the sheet is full.
Keep the following standards for the final drawing:
- Set all line thicknesses to 0.2mm. The line thickness you set does not affect the cut width, but simulates in your drawing how wide the cut will be and what level of detail is still achievable.
- Turn off all tessellations, turn on the line colors. The lines in your drawing will become paths for our cutting machines.
- Drawing color for cutting = blue (RGB 0.0.255)
- Character color for engraving = red (RGB 255.0.0)
- Do not create new Artboards in the Illustrator file, only the first Artboard is read and executed. (So you create a separate file for each sheet ).
- If you need the outside shape and you want a neat edge make a blue frame around the file so it will be cut, in fact most of the time our boards are oversized.
- When saving the file, always make sure that 'Create PDF Compatible File' is checked.
Drawing shapes
First we are going to make a stencil of a fingertip. We want to be able to paint the black part later.
Draw shapes, for example by using a stroke and giving it a certain thickness. We do this for the edge of the finger. You can also draw planes, such as for the nail. You can briefly turn on the tessellation to get an idea of the overall shape. When you are satisfied with the shape you can convert it to cutting paths along the perimeter. First we convert the stroke (outer edge of the finger) to outside lines.
You do this through Object > Path > Outline Stroke.

The middle line disappears and an outline around the thick line takes its place. Because the tessellation is still on, everything remains the same.
Now we have two planes; the shape of finger and the nail. We still have to merge them.

Merging shapes is done with the Pathfinder.
Select both objects and choose:
Pathfinder > Unite.
The Pathfiner menu can be found under Window.

The two shapes are now joined and there is one closed outline.

Now if you turn off the tessellation & set the line width to 0.2mm blue, you have a cutable file.
Add shapes as desired until your stencil is complete.
Add a border and try if you can upload this file to our web app!

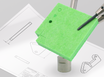
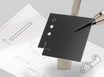
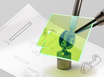
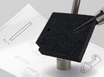
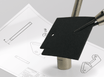
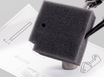
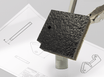
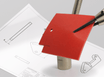
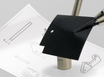
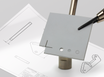
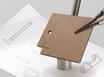
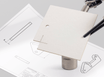
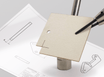
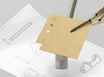
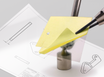
Above drawing cut out in MDF 2mm (right) & the image applied with spray paint (left).
Drawing text
Letters and text follow a similar process; draw and then convert to outlines.
Choose an appropriate font; for stencils, simple letters with wide strips are best. Most letters have inner whites that detach without bridging after cutting.
You can find many (free) stencil fonts that already have solutions for this, but you can also make bridges yourself (see below).
Here we start with a letter without a bridge. Set the size to the right size and convert the letter to lines.
Type > Create Outlines.
Tip: The context menu (right-click on the text) also contains the 'create outlines' option.

You can see from the selection points that the shape now consists of vector lines.
The next step is to connect the inner white with a bridge to the rest of the stencil.

For the little bridge, draw a shape; here we use a rectangle, but a "stroke" is also possible.
Make sure the bridge is wide enough; 2mm or more is safe for small shapes, but large areas need more or wider bridges.
Now select the letter and rectangle & choose "Trim" from the Pathfinder menu.
Illustrator will cut the rectangle out of the letter.
Window > Pathfinder > Trim

The pathfinder does not know which shape you need and has created three shapes: the letter with cut-out bridge, the loose inner white & the loose bridge.
The last two are not needed and should be removed.
To check that everything not needed is gone you can select everything and give it a fill color.
For example, here you see the inner piece colored red; it still needs to be removed.

Turn off the tessellations & the line width to 0.2mm blue. What remains are again the outside lines that will serve as cut lines. Add a border if necessary and again try if you can upload this file to our web app!
Complex forms
With more complex shapes, be careful that everything is connected.
Don't be too sparing with bridges and don't make them too narrow.
The more bridges/tabs you start adding in your drawing, the better the whole stays together.
Moreover, the whole is also a lot more solid and thus easier to use if you want to hang the spray stencil on a wall, for example.
Check out our materials overview for some inexpensive materials suitable for this application!
Below is an example of a drawing with little white space (left) & one with more white space (right).
